
Patient Portal Setup
The Patient Portal provides a means for your patients to:
-
Request an appointment
-
Send messages to and receive messages from your office
-
View prescriptions and request prescriptions refill
-
View account balance and make a payment to their account
-
View medical history
-
View patient education materials
Set Up Patient Portal for a Patient
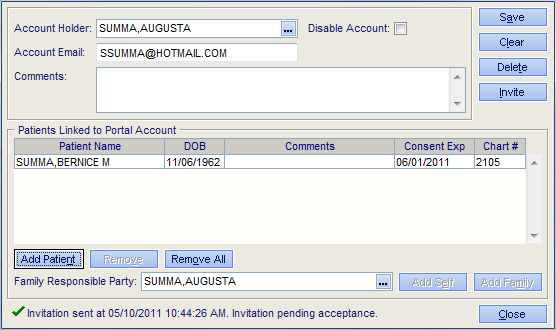
Setup for the patient portal is done in the PM. Simply enter the account holder’s email address and name and attach any patient that should be associated with the account.
There are two ways to enter Patient Portal Setup.
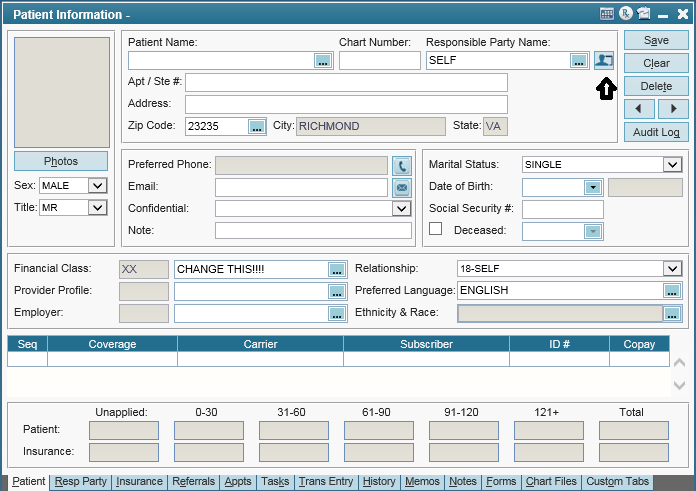
- On the Patient Information screen, to the right of the Responsible Party field, is the Patient Portal button, which will take you to that patient's portal account, from where you can fill in their email address.
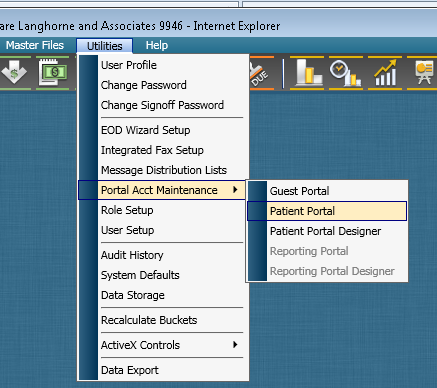
- Alternatively, you can go to the Utilities menu, Portal Acct Maintenance, Patient Portal. There you can type in the patient's information or hit the ellipsis to bring up existing patients.
Important Notes:
- The Patients Linked to the Portal Account grid controls whose patient chart information the Account Holder can view in the Patient Portal (i.e., the Account Holder can view chart information for all patients displayed in grid)
- The Family Responsible Party field determines which patient accounts the Account Holder can make payments to through the Patient Portal (i.e., the Account Holder can make payments to any patient account tied to the responsible party listed in the Family Responsible Party field)
When setting up a portal account, first determine what the Account Holder would like to do with the account:
-
Make payments only
-
View chart information only
-
Make payments and view chart information
Make Payments Only
The Account Holder will be able to make payments on any patient tied to the responsible party you enter in the Family Responsible Party field.
-
Enter the name of the Account Holder.
-
Enter the account holder’s Account Email.
-
Enter any Comments, if applicable.
-
Select the responsible party in the Family Responsible Party field.
Notes:
- Patients will automatically be removed from the account on their 18th birthday.
- You can manually remove a patient from the account by adding the patient to account again and setting an expiration date prior to today’s date.
-
Click Save.
-
Click the Invite button. An email will be sent to the email address of the Account Holder providing account activation instructions.
View Chart Information Only
-
Enter the name of the Account Holder.
-
Enter the account holder’s Account Email.
-
Enter any Comments, if applicable.
-
Click Add Patient.
-
Enter the Patient Name.
-
If the consent for the Account Holder to access this patient’s patient portal should expire, enter the Consent Expiration date.
-
Enter any Comments, if applicable.
-
Click OK.
Note: The Family Responsible Party field is not required if the Account Holder is only going to view patient information in the Patient Portal and not make payments on the patient’s accounts.
-
Click Save.
-
Click the Invite button. An email will be sent to the email address of the Account Holder providing account activation instructions.
Make Payments and View Chart Information
-
Enter the name of the Account Holder.
-
Enter the account holder’s Account Email.
-
Enter any Comments, if applicable.
-
Select the responsible party in the Family Responsible Party.
-
Click Add Self if the Account Holder should be able to view the responsible party’s chart information in the patient portal.
-
Click Add Family if the Account Holder should be able to view the chart information of all patients tied to the responsible party listed in the Family Responsible Party field.
-
To add additional patients to the portal account, click Add Patient.
- Enter the Patient Name.
- If the consent for the Account Holder to access this patient’s patient portal should expire, enter the Consent Expiration date.
- Enter any Comments, if applicable.
- Click OK.
-
When you have added all desired patients to the portal account click Save.
-
Click the Invite button. An Patient Portal Account Notification email will be sent to the email address of the Account Holder providing account activation instructions.
After the Invitation to the Portal has Been Made
After you have sent the email, the Account Holder has 30-days to activate their portal account by clicking the included activation link. If the account holder misses the 30-day window, change the Consent Expiration date and resend the invitation.
The Account Holder will be prompted to enter a security question, security answer, and a password for the patient portal account.Once the account is activated, account holders can log in to the Patient Portal to send and receive messages, and make payments.
The following is the link to the Patient Portal (make sure to replace the x’s with your office key):
https://patientportal.advancedmd.com/account/LogOn?lk=xxxxxx
Disable an Account
Go to Utilities | Portal Acct Maintenance | Patient Portal.
-
Enter the account holder’s Account Email.
-
Select the Disable Account check box.
-
Click Save.